Nail art designs can be created just by using household items. No professional nail tools are needed. You can choose to wear one as an accent nail. Mix or match a few or you can do all five.
Base Coat: Start off by applying base coat to protect your nails.
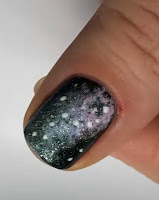
1. Galaxy Inspired Design:
Begin by applying two coats of a black polish as your base. Apply a latex barrier on the skin surrounding the cuticles to protect from excess cleanup. An alternative would be to swap our tape or clean up with polish remover.
Apply white polish on to a small piece of cut up dish sponge and begin dabbing it onto the nail for the base. This will allow the colors that go over top to pop. Once the white base has dried down, repeat the same step with a purple polish and dab it onto one-third of the white base. Repeat the same step with a blue polish and dab onto the second-third of the white base. Repeat the same step for a final time using a green polish to fill in the last third of the nail.
If you feel you have covered up too much of the black background with colors, dab on some black polish in preferred areas. Use a toothpick paired with white polish to dot on tiny dots to mimic stars. For an optional pop up glam apply a final emailed shimmer or glitter polish in a clear base over top the nail. Use tweezers to remove the latex barrier. Use cleaner brush or q-tip paired with polish remover and clean up any excess polish if necessary.
2. Metallic Splat:
Start off by applying two coats of a blue polish as your base. Apply a latex barrier on the skin surrounding the cuticle. Use a silver metallic polish and allow One drop to freely fall from the bristles into a cup of room-temperature filtered water. Spray rubbing alcohol onto the surface of the water to break apart the polish followed by dipping your nail into the water. Gently blow on the surface to dry down the excess polish while your finger is still submerged in the water and remove surface polish with a q-tip before removing your nail. Use tweezers to carefully remove the latex barrier. Clean up any excess polish if needed using a cleaner brush for q-tip paired with polish remover.

Begin by applying two coats of light pink polish as your base. Apply rose gold glitter polish onto a sponge eyeshadow applicator and gently dab the concentrating only on the tip of the nail for this first part. Repeat the step for a second time focusing the glitter a little higher up on the nail.
4. Linear Statement:
Begin by applying two coats of a bright pink polish as your base. Use a white polish paired with a repurpose liquid eyeliner brush. Now made into a nifty little nail art brush and begin drawing on a vertical line down on the middle of the nail. Apply a second coat of white polish to reach full opacity if needed.
5. Diagonal Dotticure:
Begin by applying two coats of a bright yellow polish as your base. Use black polish dipped onto the end of a hair bobby pin and apply spaced-out dots in a diagonal direction. Use a toothpick paired with black polish to fill in the gaps with smaller dots.


Comments
Post a Comment